Vlans are eery where no matter whether you are a network engineer, systems administrator, or even a programmer, You must be familiar with VLANs and have a good understanding of how VLANs work in a network.
What is a VLAN in Simple Words?
VLAN stands for Virtual Local Area Network, it allows us to create a different virtual network inside a Local Area Network. Vlan configuration is made in switches. We specify a range of ports to a VLAN and then, all devices related to these ports and this VLAN are not talking to other VLANs. Now that means that it must be at least one VLAN so that a router can work, which is created by default in a Switch and in all cisco switches its Vlan1.
VLAN advantages
These are the reasons why you need to use VLAN in your LAN:
– More secure: Each group/VLAN is separated from another group, group here means subnetwork.
– Minimize equipment and costs: you do not need a switch and any additional cables for each VLAN.
– Reduce broadcast domains: Broadcast domains are making your network less secure and consume bandwidth.
– Efficient performance: because of reducing broadcast domains that allow computer resources to not receive unwanted traffic.
What are VLAN types?
– Data VLAN: used for transferring data.
– Management VLAN: used by administrators for network configuration.
– Default VLAN: it is always (VLAN 1) and all interfaces are assigned to it by default. there is also vlan1002, vlan1003, vlan1004, vlan1005 all are default VLANs. They cannot be removed and they are reserved for other technologies like fiber optic and token ring networks.
– Native VLAN: This is a VLAN that is used when traffic is unknown.
– Voice VLAN: This type is used for voice-over IP, and it allows to increase voice quality and preserve bandwidth. Packets transmitted in this VLAN have more priority so they should arrive at their destination in less than 150ms.
Note: Each VLAN has an ID and a name.
How many VLANs I can create in Cisco Switch?
The maximum number of VLANs is calculated like this: 2^12 = 4096.
it is determined by VLAN id which is using 12 bits, which means 2 possibilities (0/1) to the power of 12 gives you 4096 difference number r ID in our case.
● VLANs range starts from 0 – 4095.
● VLAN 4095 is reserved and is also VLAN 0 is reserved to be used for unknown traffic. This means we have available vlan IDs from 1 – 4094.
Ranges of VLANs
Now we know that VLAN 1 is the default VLAN. but now one thing to keep in mind is that VLANs are separated into 2 ranges:
- Normal range : numbered from 1 to 1005
- Extended range : numbered from 1006 to 4094
Since we have vlan 1,1002,1003,1004,1005 as default VLANs that means we have a free range from vlan 2 to vlan 1002. Newly created VLANs are stored in the flash memory in a file called vlan.dat. The extended range VLANs are stored in the NVRAM configuration file.
Note: Normal range VLANs can use VTP “virtual trunking protocol” that allows automating VLAN configuration when you have multiple switches that connect VLANs.
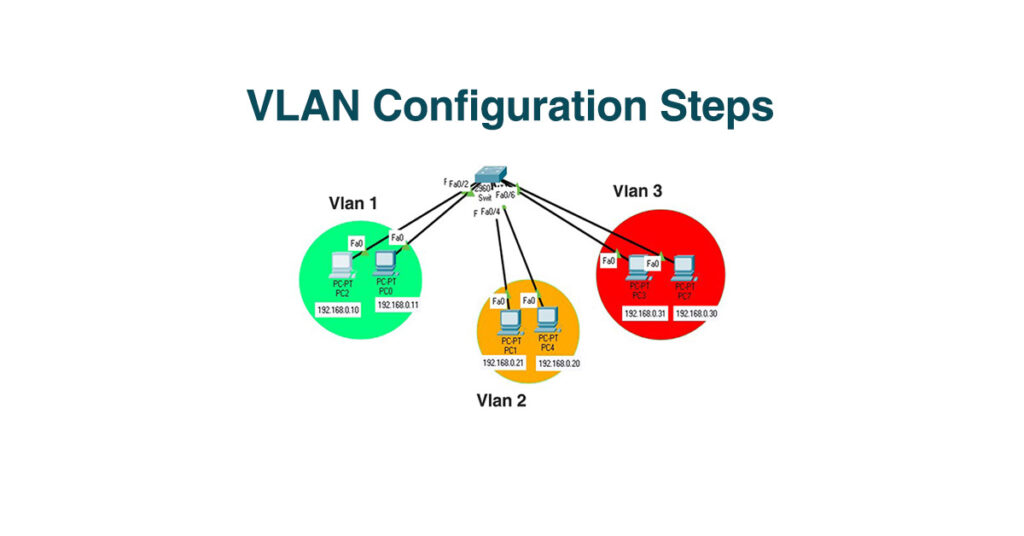
VLAN Configuration in Cisco Switch:
Now let’s see how to create and configure VLAN in a Network (Switch) so that you can be able to use see all this theory in practice.
1. Single interface method:
► First Go to your switch global conf mode.
► Create a VLAN by this command (Id must be different than 1, 1002/3/4/5 and must be < 4094. That means choosing an ID between 2 to 1001.
|Switch(config)# vlan "ID"
|Switch(config-vlan)# name "vlanName"
► Now go to global configuration mode again and configure you switch interfaces so that you change the VLAN assigned to the interface from the default VLAN to the new VLAN that you’ve created. After switchport access vlan simply enter the new VLAN id that you’ve created.
|Switch(config)# int "InterfaceName NB"
|Switch(config-vlan)# switchport mode <access>
|Switch(config-vlan)# switchport access vlan "ID"
2. Multiple interface method:
In case you have a lot of hosts connected to a switch Now we have to use the keyword”range” to simplify the configuration and to add more than one port into a VLAN just with one click.
► Go to global configuration mode and create a new VLAN.
|Switch(config)# vlan "ID"
|Switch(config-vlan)# name "vlanName"
► Go back to global configuration mode and specify a range of interfaces (suppose we have 7 hosts starting from fa0/1 to fa0/7).
|Switch(config)# int range fa0/0-7
|Switch(config)# switchport mode aceess
|Switch(config)# switchport access vlan "ID"
Now by using range you are specifying a range of interfaces to be added to a VLAN at the same time. We can connect a VLAN to different switches, this can be done by using the trunk option. Trunk technology is a solution to connect the same VLANs to each other between different switches.
How to show VLAN configuration in Cisco switch?
Use the command “show VLAN brief” in privileged mode to see all VLAN configurations.
|Switch# show vlan brief
Trunking protocol in VLAN?
Trunking protocol allows connecting VLANs in different switches. In a Cisco switch, we can enable trunk mode, by turning the interfaces that connect two switches to use trunk rather than access mode. So that we can allow connection to be approved between connected switches to carry different VLANs traffic.
All switches today use a standard trunking protocol invented by IETF called 802.1q.
The process of trunking protocol:
How Trunking protocol works in Cisco Switch?
When a host sends a segment to the switch that is connected to, the switch simply checks if the destination host is located in the local VLAN, if not it adds a tag to identify the source VLAN, So the other switch where the receiver host connected with can easily forward the data tot its destination.
You can use this command to see the interface enabling trunk mode and their details:
|Switch# show int trunk
Note: Always turn interfaces that are connected to different switches or different vlan destinations to trunk mode.
You can configure trunk mode interfaces like this, so what you simply do is that you assign all VLANs you want to be trunked or transmitted between different switches. Now the thing to remember going to each of the ports that connect the switches and turn them to the trunk.
|Switch(conf)# int range f0/1-n
|Switch(config-if-range)# switchport mode trunk
|Switch(config-if-range)#switchport trunk allowed vlan 1-n